
개요
- GCM 앱 개발 따라하기.
이 문서에서는...
이 문서는 GCM에 제공되는 도움 라이브러리를 사용하여 안드로이드 앱과 서버측 로직 작성방법을 서술합니다 (client와 server).
Google API 프로젝트 만들기
Google API 프로젝트 만들 준비:
- Google APIs Console page 열기.
프로젝트를 만든적이 없다면 다음과 같은 페이지로써 입력을 기다릴 것입니다:

주: 이미 프로젝트를 만들었었다면, 처음에 Dashboard 페이지가 보일것입니다. 거기서 (왼쪽 위 구석) project drop-down 메뉴를 열어서 새 프로젝트를 만들 수 있을 것이고 Other projects > Create 선택.
- Create project 클릭. 브라우저 URL이 다음과 같이 변경될 것입니다:
#project:(이 예에서는 4815162342) 다음의 값을 적어놓으십시오. 이것이 project ID 이며, 이후에 GCM 전송자 ID로 사용될 것입니다.
https://code.google.com/apis/console/#project:4815162342
GCM 서비스 활성
GCM 서비스 가능하게 하기:
- Google APIs Console 페이지에서 Services 선택.
- Google Cloud Messaging 을 ON 으로 변경.
- Terms of Service page 에서, accept the terms 클릭.
API Key 얻기
API key를 얻기 위해서:
- Google APIs Console 페이지에서, API Access 선택. 다음의 화면 나타남:
- Create new Server key 클릭. 다음의 화면 나타남:
- Create 클릭:


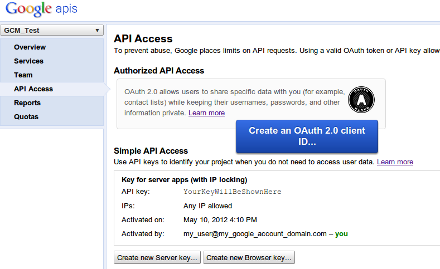
API key 값을 적어놓는다 (이 예에서는 YourKeyWillBeShownHere), 나중에 쓸 것입니다.
주: 키의 교체가 필요하면, Generate new key 클릭. 기존 키가 여전히 활성 되어 있는 24시간 내에 새 키가 생성될 것입니다. 기존 키의 즉시 제거를 원한다면 (예를들어, 문제가 되는듯 느껴진다면), Delete key 클릭.
Helper Libraries 설치
다음 단계들을 수행하기 위해서는, 먼저 helper libraries을 설치해야 합니다 (참조:client와 server). SDK Manager에서 Extras > Google Cloud Messaging for Android Library 설치. YOUR_SDK_ROOT/extras/google/ 하위에 gcm directory를 만들것이며 그 하위는: gcm-client,gcm-server, samples/gcm-demo-client, samples/gcm-demo-server, samples/gcm-demo-appengine 입니다.
Android 응용프로그램 제작
이 부분에서는 안드로이드 앱에서 GCM사용에 관련된 단계들을 서술합니다.
단계 1: gcm.jar 파일을 앱 classpath에 복사
SDK의 gcm-client/dist 디렉토리에서 앱의 classpath로 gcm.jar 파일을 복사.
단계 2: Android manifest 수정
- GCM은 Android 2.2 이상 필요하므로 xx 가 최신 target SDK 버젼이 되도록 하여 다음의 줄 추가:
- 이 앱만이 GCM 메세지를 받을수 있도록 사용자정의 권한 선언하고 사용:
- 다음의 권한 추가:
- 다음의 broadcast receiver 추가:
- 다음의 intent 서비스 추가:
<uses-sdk android:minSdkVersion="8" android:targetSdkVersion="xx"/>
<permission android:name="my_app_package.permission.C2D_MESSAGE" android:protectionLevel="signature" />
<uses-permission android:name="my_app_package.permission.C2D_MESSAGE" />
my_app_package.permission.C2D_MESSAGE 권한은 호출되어야 합니다(my_app_package는 앱의 manifest 태그에 정의된 패키지명), 아니면 작동하지 않을것입니다.
주: 앱 목표 버젼이 4.1 이상이면권한은 필요 없습니다 (i.e., minSdkVersion 16)
<!-- App receives GCM messages. -->
<uses-permission android:name="com.google.android.c2dm.permission.RECEIVE" />
<!-- GCM connects to Google Services. -->
<uses-permission android:name="android.permission.INTERNET" />
<!-- GCM requires a Google account. -->
<uses-permission android:name="android.permission.GET_ACCOUNTS" />
<!-- Keeps the processor from sleeping when a message is received. -->
<uses-permission android:name="android.permission.WAKE_LOCK" />
<receiver android:name="com.google.android.gcm.GCMBroadcastReceiver" android:permission="com.google.android.c2dm.permission.SEND" >
  <intent-filter>
    <action android:name="com.google.android.c2dm.intent.RECEIVE" />
    <action android:name="com.google.android.c2dm.intent.REGISTRATION" />
    <category android:name="my_app_package" />
  </intent-filter>
</receiver>
This broadcast receiver is responsible for handling the 2 intents that can be sent by GCM (com.google.android.c2dm.intent.RECEIVE andcom.google.android.c2dm.intent.REGISTRATION) and should be defined in the manifest (rather than programmatically) so that these intents can be received even if the application is not running. By setting thecom.google.android.c2dm.permission.SEND permission, you are ensuring that only intents sent by the GCM system framework are sent to the receiver (a regular application cannot issue intents with that permission).
Notice that android:name in the category tag must be replaced by your application's package name (and the category tag is not required for applications targeted to minSdkVersion 16 and higher).
<service android:name=".GCMIntentService" />
This intent service will be called by the GCMBroadcastReceiver (which is is provided by GCM library), as shown in the next step. It must be a subclass of com.google.android.gcm.GCMBaseIntentService, must contain a public constructor, and should be named my_app_package.GCMIntentService (unless you use a subclass of GCMBroadcastReceiver that overrides the method used to name the service).
단계 3: my_app_package.GCMIntentService 클래스 작성
my_app_package.GCMIntentService 클래스(GCMIntentService.java)를 만들고, 다음의 (GCMBroadcastReceiver에 호출되는) callback 함수들을 overriding 하십시오:
onRegistered(Context context, String regId): Called after a registration intent is received, passes the registration ID assigned by GCM to that device/application pair as parameter. Typically, you should send theregidto your server so it can use it to send messages to this device.onUnregistered(Context context, String regId): Called after the device has been unregistered from GCM. Typically, you should send theregidto the server so it unregisters the device.onMessage(Context context, Intent intent): Called when your server sends a message to GCM, and GCM delivers it to the device. If the message has a payload, its contents are available as extras in the intent.onError(Context context, String errorId): Called when the device tries to register or unregister, but GCM returned an error. Typically, there is nothing to be done other than evaluating the error (returned by errorId) and trying to fix the problem.onRecoverableError(Context context, String errorId): Called when the device tries to register or unregister, but the GCM servers are unavailable. The GCM library will retry the operation using exponential backup, unless this method is overridden and returns false. This method is optional and should be overridden only if you want to display the message to the user or cancel the retry attempts.
주: The methods above run in the intent service's thread and hence are free to make network calls without the risk of blocking the UI thread.
단계 4: 앱 main activity 작성
앱의 main activity에 다음의 중요한 구문을 삽입:
import com.google.android.gcm.GCMRegistrar;
onCreate() method에 다음의 코드 추가:
GCMRegistrar.checkDevice(this);
GCMRegistrar.checkManifest(this);
final String regId = GCMRegistrar.getRegistrationId(this);
if (regId.equals("")) {
  GCMRegistrar.register(this, SENDER_ID);
} else {
  Log.v(TAG, "Already registered");
}
The checkDevice() method verifies that the device supports GCM and throws an exception if it does not (for instance, if it is an emulator that does not contain the Google APIs). Similarly, the checkManifest() method verifies that the application manifest contains meets all the requirements described in Writing the Android Application (this method is only necessary when you are developing the application; once the application is ready to be published, you can remove it).
Once the sanity checks are done, the device calls GCMRegsistrar.register() to register the device, passing the SENDER_ID you got when you signed up for GCM. But since the GCMRegistrar singleton keeps track of the registration ID upon the arrival of registration intents, you can call GCMRegistrar.getRegistrationId()first to check if the device is already registered.
주: It is possible that the device was successfully registered to GCM but failed to send the registration ID to your server, in which case you should retry. See Advanced Topics for more details on how to handle this scenario.
서버측 응용프로그램 제작
서버측 응용프로그램 제작을 위해:
- SDK의
gcm-server/dist디렉토리의gcm-server.jar파일을 서버 classpath 에 복사. - 안드로이드 앱이 GCM으로 부터 받는 등록ID를 전송하는데 사용될 수 있도록 서블릿 만들기 (또는 다른 서버측 mechanism). 앱은 다른 정보—사용자 메일주소나 이름같은—전송도 필요하여 사용자 기기와 등록ID를 연계시킬 수 있습니다.
- 유사하게, 등록ID들을 등록해제시키는 서블릿도 만듭니다.
- 서버가 기기에 메세지 전송이 필요할때, GCM library의
com.google.android.gcm.server.Senderhelper 클래스를 사용할 수 있습니다. 예를들면:
import com.google.android.gcm.server.*;

Sender sender = new Sender(myApiKey);
Message message = new Message.Builder(regId).build();
Result result = sender.send(message, 5);
위 코드조각이 수행하는 것은:
- 프로젝트 API key를 사용하여
Senderobject 만들기. - 주어진 등록 ID로 메세지 만들기 (the message builder also has methods to set all message parameters such as the collapse key and payload data).
- 메세지 최대 5회 재 전송 (GCM 서버 사용불가시)하고 응답 결과 저장.
다음의 경우 결과 parse와 적절한 행동이 필요합니다:
- 메세지가 생성되었으나 반환값이 기존 등록 ID이면, 현재 등록 ID로 교체해야 합니다.
- 반환된 오류가
NotRegistered이면 기기에서 앱이 제거된 것이기때문에 등록 ID를 제거해야 합니다.
위의 2가지 조건들을 다루는 코드 조각들:
if (result.getMessageId() != null) {
 String canonicalRegId = result.getCanonicalRegistrationId();
 if (canonicalRegId != null) {
   // same device has more than on registration ID: update database
 }
} else {
 String error = result.getErrorCodeName();
 if (error.equals(Constants.ERROR_NOT_REGISTERED)) {
   // application has been removed from device - unregister database
 }
}